If you want to know the latest way to permanently turn off Windows 10 Update, you can try this tutorial. We have tried this tutorial on [Windows 10 Home Version 1903 (OS Build 18362.30)] and it worked.
How to permanently turn off Windows 10 updates?
There are 4 steps to permanently turn off Windows 10 Update.
- Step 1 using Services (services.msc).
- Step 2 using the Registry Editor (regedit).
- Step 3 using File Explorer.
- Step 4 using the Command Prompt.
A. Step 1: by using Services (services.msc).
1. Press the
[Windows+R] Button or use
[Start-Run] to open the Run Command.
2. Type
[services.msc] to run the
[Services] feature.
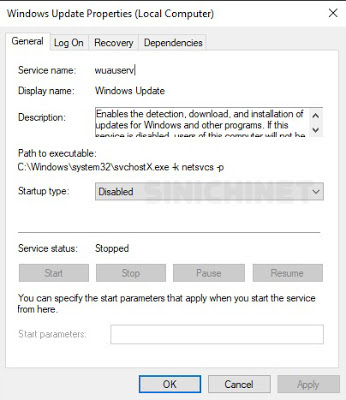
3. Select the
[Windows Updates] option in the right hand column, and double-click it so that the
[Windows Update Properties (Local Computer)] window appears.
4. On the
[General] tab, for the
[Startup type] section, select the
[Disabled] option. After that, press the
[Stop] button.
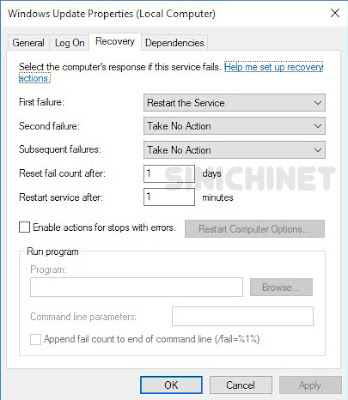
5. Select the
[Recovery] tab. In the
[First failure] section, change the
[Restart the Service] option to
[Take No Action]. Click the
[Apply] and
[OK] button.
B. Step 2: Using the Registry Editor (regedit).
We will change the data in the
[wuauserv, WaaSMedicSvc, UsoSvc] section.
1. Press the
[Windows+R] button or use
[Start-Run] to open
[Run Command].
2. Type
[regedit] to run
[Registry Editor].
3. Follow the navigation below:
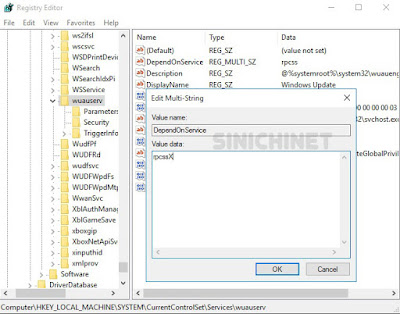
HKEY_LOCAL_MACHINE\SYSTEM\CurrentControlSet\Services\wuauserv
4. Change the data on
[DependOnService] and
[ImagePath].
- DependOnService : change [rpcss] to [rpcssX].
- ImagePath : change [%systemroot%\system32\svchost.exe -k netsvcs] to [%systemroot%\system32\svchostX.exe -k netsvcs]
5. Follow the navigation below:
HKEY_LOCAL_MACHINE\SYSTEM\CurrentControlSet\Services\WaaSMedicSvc
6. Double-click on the
[Start] section, and change the number [3] to [4]. Then change the data on
[DependOnService] and
[ImagePath].
- DependOnService : change [rpcss] to [rpcssX].
- ImagePath : change [%systemroot%\system32\svchost.exe -k netsvcs] to [%systemroot%\system32\svchostX.exe -k netsvcs]
7. Follow the navigation below:
HKEY_LOCAL_MACHINE\SYSTEM\CurrentControlSet\Services\UsoSvc
8. Double-click on the
[Start] section, and change the number [3] to [4]. Then change the data on
[DependOnService] and
[ImagePath].
- DependOnService : change [rpcss] to [rpcssX].
- ImagePath : change [%systemroot%\system32\svchost.exe -k netsvcs] to [%systemroot%\system32\svchostX.exe -k netsvcs]
C. Step 3 : Using File Explorer.
1. Press the
[Windows+E] button or use
[Start-Windows System-File Explorer].
2. Follow the following navigation:
C:\Windows\SoftwareDistribution.
3. Delete all folders & files contained in the Download folder.
The next step is: take over [permission] from [System] on the file:
- wuaueng.dll
- wuauclt.exe
- WaaSMedicAgent.exe
- WaaSMedicSvc.dll
- WaaSMedicCapsule.dll
- WaaSMedicPS.dll
- UsoClient.exe
- usosvc.dll
All files can be found at
C:\Windows\System32\ Find the
[wuaueng.dll] file by following this navigation:
C:\Windows\System32\wuaueng.dll
5. Right-click on the file and select the
[Properties] option. Then select the
[Security] tab, and click the
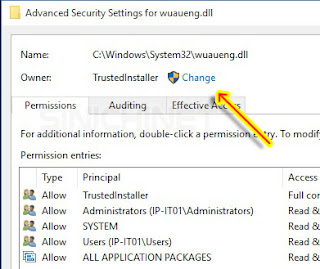
[Advance] button to open the
[Advance Security Settings] window.
6. In the
[Owner] section, click on
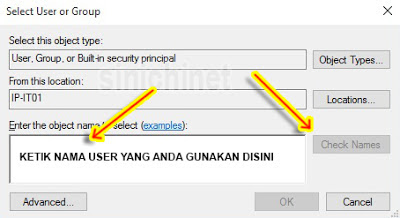
[Change]. Type your username, then press the
[Check Names] button, then the
[OK] button. Continue clicking the
[OK] button next, until the
[Properties] window closes. We must close the
[Properties] window first so that the addition of the user name that we did earlier was processed by the Windows system.
7. Repeat method No.5 for the
[wuaueng.dll] file to open the
[Advance Security Settings] window again.
8. Double click on one of the names in the Principal column (such as TrustedInstaller), so that the
[Permission Entry] window appears. Remove all check marks except for the read section in the
[Basic Permission] section Then press the OK button.
9. Perform step no.8 on all
[Principal]. Then click the
[Apply] and
[OK] button. Continue clicking the
[OK] button until the
[Properties] window closes.
10. Repeat steps No.5 through No.9 for all of the following files:
wuauclt.exe, WaaSMedicAgent.exe, WaaSMedicSvc.dll, WaaSMedicCapsule.dll, WaaSMedicPS.dll, UsoClient.exe, and usosvc.dll.
D. Step 4 : Using Command Prompt.
1. Follow the navigation below:
Start - Windows System - Command Prompt.
2. Run
[Command Prompt] as
[Administrator].
3. Type or copy the command below then press Enter.
takeown /f "%windir%\System32\UsoClient.exe" /a
4. Continue by typing or copy the command below and press Enter.
icacls "%windir%\System32\UsoClient.exe" /inheritance:r /remove "Administrators" "Authenticated Users" "Users" "System"
Note: If you want to run the [UsoClient] feature again, because you want to update Windows, you can use the following command:
icalcs "%windir%\System32\UsoClient.exe" /reset
5. Restart your computer.
Hopefully this article can be useful for those of you who need it.


