Showing posts with label Android. Show all posts

Monday, July 1, 2019

WhatsApp - How To Configure "Enter" Button To Create New Line In Chat

How do I set the Enter key to create a new line on WhatsApp chat?

# Open WhatsApp. Open the WhatsApp app, and press the Settings button which is 3 vertical dots on the right.

create a new paragraph, change the send key to enter, bring up the enter key, how to space down on whatsapp android, how settings, whatsapp messages are not immediately sent. smartphones, tips, tricks, tutorials

# Settings. Select the Settings option.

create a new paragraph, change the send key to enter, bring up the enter key, how to space down on whatsapp android, how settings, whatsapp messages are not immediately sent. smartphones, tips, tricks, tutorials

# Chats. Select Chats Options.

create a new paragraph, change the send key to enter, bring up the enter key, how to space down on whatsapp android, how settings, whatsapp messages are not immediately sent. smartphones, tips, tricks, tutorials

# Enter is send. Uncheck the "Enter is send"

create a new paragraph, change the send key to enter, bring up the enter key, how to space down on whatsapp android, how settings, whatsapp messages are not immediately sent. smartphones, tips, tricks, tutorials

By doing so, your Enter key will work to create a new paragraph / line instead of sending a message. Here's a quick tutorial on How to Configure the Enter Button To Create a New Line On WhatsApp Chat. Hopefully useful for you all.

Saturday, June 29, 2019

How To Mute WhatsApp Group Notification Sound

How to Turn off WhatsApp Group Notification Sound?

The trick is very easy, please follow the tutorial below to eliminate the sound of WhatsApp group notification:

Go to WhatsApp. First, please open your WhatsApp app and the chat group you are following.

Settings button. press the Settings button in the form of 3 vertical dots.

How To Mute WhatsApp Group Notification Sound, Turn off WhatsApp Group Notification Sound, remove the WhatsApp group notification, disable, mute, delete, notification sound, whatsapp chat group, android, smartphone, annoying sound

Mute Options. Choose the Mute option

How To Mute WhatsApp Group Notification Sound, Turn off WhatsApp Group Notification Sound, remove the WhatsApp group notification, disable, mute, delete, notification sound, whatsapp chat group, android, smartphone, annoying sound

Mute Group. You will find 3 mute time options: 8 hours, 1 week, and 1 year. For the "Show notifications" option you can check or not. Then press "OK"

How To Mute WhatsApp Group Notification Sound, Turn off WhatsApp Group Notification Sound, remove the WhatsApp group notification, disable, mute, delete, notification sound, whatsapp chat group, android, smartphone, annoying sound

After this, you will not be bothered again by the sound of WhatsApp group notification from your Android smartphone.

Well .. That's the article on how to remove the WhatsApp group notification. Hopefully useful for you.

Thursday, June 27, 2019

WhatsApp - How To Disable "Last Seen" Feature

If you are uncomfortable with the "Last Seen" feature, you can easily disable the feature, but you also will not be able to see the "Last Seen" status of other WhatsApp users.

How To Disable "Last Seen" Feature, whatsapp, app, android, aplikasi, fitur whatsapp, tips, tutorial, cara nonaktifkan fitur last seen whatsapp, cara matikan fitur last seen, how to configure whatsapp feature, setting, you should know

How to Disable "Last Seen" Feature On WhatsApp?

To disable the "Last Seen" feature in the WhatsApp app, please follow the instructions in the following tutorial:

# Go to WhatsApp. Please open WhatsApp first and press the Settings button which is 3 vertical dots on the right

How To Disable "Last Seen" Feature, whatsapp, app, android, aplikasi, fitur whatsapp, tips, tutorial, cara nonaktifkan fitur last seen whatsapp, cara matikan fitur last seen, how to configure whatsapp feature, setting, you should know

# Settings. Select the "Settings" option.

How To Disable "Last Seen" Feature, whatsapp, app, android, aplikasi, fitur whatsapp, tips, tutorial, cara nonaktifkan fitur last seen whatsapp, cara matikan fitur last seen, how to configure whatsapp feature, setting, you should know

# Accounts. Select the "Account" option.

How To Disable "Last Seen" Feature, whatsapp, app, android, aplikasi, fitur whatsapp, tips, tutorial, cara nonaktifkan fitur last seen whatsapp, cara matikan fitur last seen, how to configure whatsapp feature, setting, you should know

# Privacy. Select the "Privacy" option.

How To Disable "Last Seen" Feature, whatsapp, app, android, aplikasi, fitur whatsapp, tips, tutorial, cara nonaktifkan fitur last seen whatsapp, cara matikan fitur last seen, how to configure whatsapp feature, setting, you should know

# Last Seen. Select the "Last Seen" option, then press the "Nobody" option.

How To Disable "Last Seen" Feature, whatsapp, app, android, aplikasi, fitur whatsapp, tips, tutorial, cara nonaktifkan fitur last seen whatsapp, cara matikan fitur last seen, how to configure whatsapp feature, setting, you should knowHow To Disable "Last Seen" Feature, whatsapp, app, android, aplikasi, fitur whatsapp, tips, tutorial, cara nonaktifkan fitur last seen whatsapp, cara matikan fitur last seen, how to configure whatsapp feature, setting, you should know

Here's the tutorial "How to Disable the Last Seen Feature On WhatsApp". Hopefully can help for those who need it.

Tuesday, June 25, 2019

How To Leave WhatsApp Chat Group

How do I leave WhatsApp chat group if I already join in?

Whether intentional or not you participate in the WhatsApp group, you can get out of the WhatsApp group afterwards. Please follow the steps as follows :

Open WhatsApp. First, please open WhatsApp and chat groups that you follow.
Settings button. press the Settings button, which form three vertical dots.

How To Leave WhatsApp Chat Group, Step-by-Step Guidelines to leave, whatsapp chat group, android smartphone, app, social media, how to, tips, tutorial

Group info. Select the Group info option.

How To Leave WhatsApp Chat Group, Step-by-Step Guidelines to leave, whatsapp chat group, android smartphone, app, social media, how to, tips, tutorial

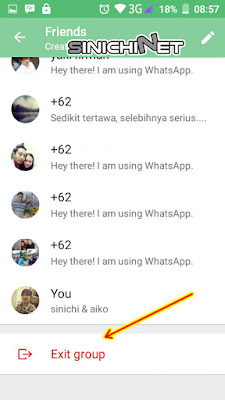
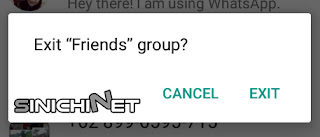
Exit group. Scroll above list of members of the group chat until 'Exit group' button appears at the bottom. If the alert box 'Exit Friend group?' appears , select the  'EXIT' .

How To Leave WhatsApp Chat Group, Step-by-Step Guidelines to leave, whatsapp chat group, android smartphone, app, social media, how to, tips, tutorial

How To Leave WhatsApp Chat Group, Step-by-Step Guidelines to leave, whatsapp chat group, android smartphone, app, social media, how to, tips, tutorial

Saturday, June 8, 2019

4 Langkah Cara Upload Gambar/Image Untuk Postingan Blogspot - Tutorial Blogger Pemula

Hai, sobat blogger. Seperti yang sudah diketahui oleh para blogger semuanya, bahwa salah satu faktor penting untuk sebuah artikel adalah image/gambar. Gambar pada artikel memiliki beberapa fungsi, diantaranya :
  • Membantu menjelaskan isi artikel, terutama untuk artikel tutorial.
  • Mempercantik artikel sehingga tidak membuat bosan pembaca.
  • Menarik perhatian pengunjung blog untuk mengunjungi artikel.
  • Menambah kesempatan blog untuk mendapatkan pengunjung dari Search Engine.
  • Dan lain-lain.
Jadi berdasarkan penjelasan singkat diatas, sobat blogger jangan lupa untuk menyertakan gambar/image pada artikel anda.

Bagaimana cara upload/unggah foto untuk postingan blogspot?

A. Pada Post Editor, klik tombol Insert Image.

cara upload gambar image untuk postingan blogspot, tutorial blogger Pemula, blogspot, panduan blogger, tips, trik

B. Pada tab Upload, klik tombol Choose Files / Pilih File. Pilihlah gambar dari lokasi penyimpanan anda. Sobat blogger bisa upload/unggah beberapa file gambar sekaligus untuk memudahkan pemasangan gambar pada artikel.

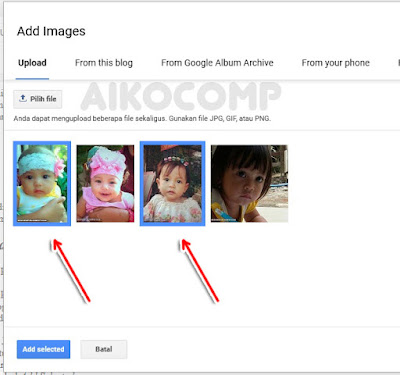
C. Jika anda sudah upload beberapa gambar sekaligus namun hanya ingin memilih gambar tertentu untuk ditampilkan pada suatu bagian artikel, anda bisa memilah gambar-gambar itu terlebih dahulu. Gambar yang akan ditampilkan ditandai dengan kotak biru. Setelah anda selesai memilah, tekan tombol Add Selected.

cara upload gambar image untuk postingan blogspot, tutorial blogger Pemula, blogspot, panduan blogger, tips, trik

D. Setelah gambar terunggah, sekarang waktunya mengatur ukuran dan posisi gambar. klik pada gambar sehingga muncul popup pengaturan.
  • Terdapat 5 pilihan ukuran yaitu : Small, Medium, large, X-Large, dan Original Size.
  • Terdapat 3 pilihan posisi, yaitu : Left, Center, dan Right.
Untuk pengaturan gambar baik itu ukuran dan posisi, sobat blogger harus mempertimbangkan template yang sobat gunakan. Silahkan bereksperimen untuk mencari settingan yang tepat bagi blog anda.

cara upload gambar image untuk postingan blogspot, tutorial blogger Pemula, blogspot, panduan blogger, tips, trik

Demikian artikel Cara Upload Gambar/Image Untuk Postingan Blogspot - Tutorial Blogger Pemula. Semoga bermanfaat bagi anda semua.

Thursday, June 6, 2019

Cara Flash Smartphone Android Menggunakan SP Flash Tool

Beberapa waktu lalu penulis mengalami permasalahan dengan smartphone Android (HH/Handheld) milik penulis. Smartphone Android penulis tiba-tiba saja selalu menginstall sendiri apk-apk tanpa pemberitahuan dan persetujuan pemilik. tentu saja hal tersebut sangat mengganggu karena dengan banyaknya aplikasi yang terinstall di HH kita dapat membuat memori terkuras habis sehingga smartphone kita berjalan lambat alias lemot. Bahkan lambat laun sering muncul popup yang langsung otomatis menutup aplikasi yang sedang dipakai oleh penulis. Beberapa teman penulis juga mengalami hal demikian, malahan kasusnya lebih parah. Di HH mereka terinstall aplikasi dan gambar-gambar yang tidak layak dikonsumsi anak kecil.

Awalnya penulis mencoba melakukan Factory Data Reset namun tidak membuahkan hasil. Smartphone penulis tetap menginstall aplikasi sendiri secara otomatis. Akhirnya tidak ada jalan lain, harus melakukan flash atau penginstallan ulang. Ketika penulis bertanya ke beberapa counter service Smartphone, harga untuk melakukan flashing antara 100-150 ribu.

Akhirnya penulis mencoba untuk melakukan flashing sendiri. Toh jika tidak berhasil juga tidak apa.. nothing to lose. Berhasil ya syukur, dan kalau gagal ya tetap dibawa ke tempat service. Alhamdulillah penulis berhasil melakukannya, bahkan penulis juga bisa membantu beberapa teman untuk melakukan flashing pada HH mereka.

Penulis menggunakan bantuan software Smart Phone Flash Tool V5. Beberapa smartphone yang sudah penulis coba flash antara lain merk MitoAdvance, dan Lenovo.

PERHATIAN!! Untuk kondisi smartphone yang hendak di-flash haruslah bisa menyala dan mati dengan normal, dengan kata lain tidak mengalami bootloop atau juga mati total. Penulis tidak berhasil ketika mencoba melakukan flashing pada HH teman yang mengalami bootloop. Mungkin diperlukan metode lain untuk mengatasinya.

Bagaimana Cara Flash Smartphone Android Menggunakan SP Flash Tool?

# Siapkan Software Pendukung. Silahkan download dulu software SP Flash Tool V5 dan Firmware/Stock Rom yang sesuai dengan jenis smartphone anda masing-masing. Ekstrak terlebih dahulu apabila keduanya masih dalam bentuk .rar atau .zip.

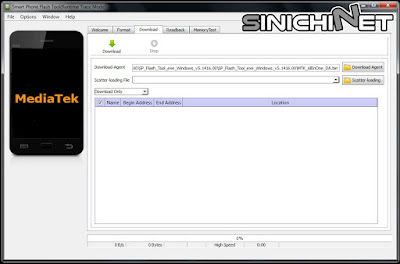
# Jalankan SP Flash Tool. Jalankan SP Flash Tool dengan klik file flash_tool.exe yang terdapat didalam foldernya.

flash, error pada smartphone, firmware, stock rom, flash android dengan pc, tutorial, cara mudah, flash tool v5, lenovo, mito, advance

# Memulai Proses Flashing. Sebelum proses flashing tolong perhatikan langkah-langkah berikut ini.
  • Matikan terlebih dahulu smartphone anda. baterei tidak usah dilepas.
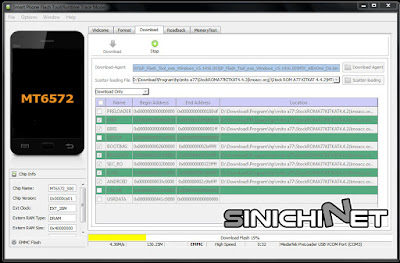
  • Upload Firmware/Stock Rom melalui tombol Scatter-loading ( Tanda No.1).
  • Perhatian!! Pastikan opsi PRELOADER tidak tercentang (Tanda No.2), sedangkan untuk opsi lainnya biarkan secara default. Opsi CACHE dan USRDATA ada yang tercentang dan ada yang tidak tergantung Firmware masing-masing smartphone.
  • Klik tombol Download (Tanda No.3).
  • Hubungkan Smartphone Android anda pada PC menggunakan kabel data dan biarkan SP Flash Tool mendeteksinya secara otomatis. Lama waktu yang diperlukan untuk mendeteksi perangkat Android anda tergantung spek PC, merk smartphone, dan kabel data yang anda gunakan.

flash, error pada smartphone, firmware, stock rom, flash android dengan pc, tutorial, cara mudah, flash tool v5, lenovo, mito, advance

# Proses Flash Berjalan. Jika langkah-langkah diatas sudah anda lakukan dengan benar dan tidak ada peringatan error apapun, maka proses flashing smartphone anda akan berjalan dengan lancar. Tunggu hingga prosesnya mencapai 100%.
Namun jika ditengah-tengah proses tiba-tiba muncul peringatan error "PMT changed for the ROM; it must be downloaded", maka yang harus sobat lakukan adalah melakukan format pada smartphone Android anda. Langkah-langkahnya bisa anda ikuti pada link dibawah ini.

flash, error pada smartphone, firmware, stock rom, flash android dengan pc, tutorial, cara mudah, flash tool v5, lenovo, mito, advance

# Proses Flashing Berhasil. Proses flash smartphone android anda dianggap berhasil apabila sudah keluar tanda centang seperti dibawah ini.
Cabut dan nyalakan Smartphone android anda. Mungkin anda harus menunggu beberapa menit untuk memberi kesempatan pada smartphone anda melakukan booting.

flash, error pada smartphone, firmware, stock rom, flash android dengan pc, tutorial, cara mudah, flash tool v5, lenovo, mito, advance

Demikian artikel Cara Mudah Flash Android Mengunakan SP Flash Tool. Semoga bermanfaat.

Tuesday, June 4, 2019

Cara Cek Tagihan Listrik Bulanan PLN Online Terbaru

Untuk memberikan kemudahan kepada para pelanggannya, kini PLN memberikan fasilitas untuk mengecek jumlah tagihan listrik bulanan secara online. Fasilitas ini berbasis web sehingga anda bisa mengecek tagihan listrik bulanan anda dimanapun anda berada, asalkan anda memiliki akses internet.
Caranya pun sangat mudah, anda tinggal memasukkan nomer ID Pelanggan anda pada form yang sudah tersedia dan hasilnya akan segera keluar.

Berikut tutorial cara cek tagihan listrik online bulanan :
  • Untuk mengecek tagihan listrik online bulanan anda silahkan terlebih dahulu menuju ke situs Cekbill.com atau bisa langsung klik DISINI.
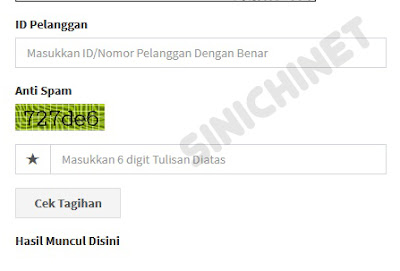
  • Anda akan mendapati sebuah box atau form sederhana seperti contoh gambar dibawah ini.
cek rekening listrik, rekening listrik pln, cek rekening listrik bulan ini, cek tagihan listrik bulanan, cek bayar listrik
  • Masukkan nomor ID Pelanggan anda. Setelah itu masukkan captcha yg berupa 6 digit tulisan.
  • Tekan Cek Tagihan dan hasilnya akan segera muncul

Demikian artikel cara cek tagihan listrik online bulanan. Semoga bermanfaat.