Showing posts with label Operating System. Show all posts

Monday, October 21, 2019

Cara Mudah Mengembalikan Folder dan File Yang Hilang Tersembunyi Akibat Virus Menggunakan Notepad

Bagi anda pengguna komputer berbasis OS Windows, pasti sudah tidak asing lagi mendengar istilah Virus Komputer. Dan salah satu hal buruk yang disebabkan oleh virus-virus tersebut adalah hilangnya Data dan Folder pada hard drive, memory, dan flashdisk (pendrive) kita.

Pasti sangat merepotkan dan tentu saja menakutkan apabila data-data penting kita seperti kerjaan kantor, tugas sekolah, skripsi, atau foto-foto kenangan tiba-tiba saja hilang. Walaupun sebenarnya data/folder tersebut tidak benar-benar hilang, hanya disembunyikan (hidden) di tempat yang sama oleh virus.

Bagaimana cara Mengembalikan Folder dan File Yang Hilang Disembunyikan Oleh Virus?

Sebelum melakukan pengembalian file/folder yang hilang, pastikan terlebih dahulu antivirus anda sudah terupdate. Mengapa? karena jika antivirus di komputer anda tidak melakukan "tugas"nya dengan baik, maka file/folder yang sudah anda temukan nanti akan disembunyikan lagi oleh virus.

Saya pribadi menggunakan 2 antivirus sekaligus yaitu Avast dan Smadav. Kedua antivirus tersebut tidak akan saling mengganggu satu dengan yang lainnya, namun justru akan saling melengkapi.

Kembali ke pokok permasalahan, untuk mengembalikan file/folder yang terhidden oleh virus sebenarnya ada beberapa cara. Namun kali ini kita hanya akan menggunakan Notepad.

Silahkan ikuti langkah-langkah berikut ini:

1. Buka Notepad. Pada Windows7, Notepad terletak di Start --> All Programs --> Accessories --> Notepad.
2. Ketik "attrib -s -h -r *.* /s /d" (tanpa tanda petik) pada Notepad, kemudian simpan (save) dan beri nama terserah yang anda inginkan.
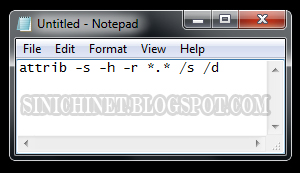
Cara Mengembalikan Folder dan File Yang Hilang Tersembunyi Akibat Virus Menggunakan Notepad, antivirus, hidden file, lost file, windows, txt, bat, attrib, tutorial, panduan, tips, trik, attrib -s -h -r *.* /s /d

3. Ganti extention .txt menjadi .bat semisal : hidden.txt menjadi hidden.bat
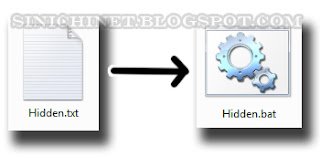
Cara Mengembalikan Folder dan File Yang Hilang Tersembunyi Akibat Virus Menggunakan Notepad, antivirus, hidden file, lost file, windows, txt, bat, attrib, tutorial, panduan, tips, trik, attrib -s -h -r *.* /s /d

4. Copy file .bat tersebut ke drive atau flashdisk dimana lokasi file/folder yang hilang berada.
5. Klik 2x file .bat itu dan tunggu hingga jendela Command Prompt menghilang. Setelah itu file dan folder anda yang disembunyikan virus akan muncul kembali.

Demikian tutorial singkat Cara Mengembalikan Folder dan File Yang Hilang Tersembunyi Akibat Virus Menggunakan Notepad. Semoga bisa membantu.

Wednesday, September 11, 2019

Cara Setting Akun Windows Terkunci Otomatis Setelah User Salah Memasukkan Password Beberapa Kali

Keamanan data-data yang terdapat dalam komputer sering kali menjadi perhatian khusus bagi penggunanya. Apalagi komputer yang digunakan terdapat pada ruangan yang bisa diakses oleh banyak orang seperti perkantoran.

Untuk mengatasinya, user bisa memberikan password untuk login Windows pada komputernya masing-masing. Namun untuk lebih meminimalisasi usaha pembobolan password, user bisa menambahkan settingan khusus untuk proses login tersebut.

Hal ini mirip dengan proses input nomer PIN pada ATM. Jika anda salah memasukkan nomer PIN beberapa kali, maka kartu anda akan tertelan. Demikian juga dengan proses login Windows, jika anda salah beberapa kali memasukkan password maka akun Windows akan terkunci selama beberapa menit

Bagaimana Cara Setting Akun Windows Terkunci Otomatis Setelah User Salah Memasukkan Password?
Untuk memberikan keamanan tambahan pada Windows, Anda bisa melakukan salah satu dari dua cara yang kami sajikan dibawah ini:

A. Melalui Run Command.

1. Klik tombol Win+R dan ketik secpol.msc
2. Ikuti navigasi berikut : Account Policies/Account Lockout Policy

Cara Setting Akun Windows Terkunci Otomatis Setelah User Salah Memasukkan Password, Cara Membuat Keamanan Tambahan Untuk Windows: Setting Security Policy, lockout threshold, lockout duration, setting windows login, tutorial, tips

3. Klik 2x pada bagian Account lockout treshold, isikan berapa kali user bisa melakukan "salah input" sebelum akunnya terkunci untuk beberapa saat. Anda bisa mengisinya pada kolom kosong disamping tulisan invalid logon attempts. Stelah itu klik OK.

Cara Setting Akun Windows Terkunci Otomatis Setelah User Salah Memasukkan Password, Cara Membuat Keamanan Tambahan Untuk Windows: Setting Security Policy, lockout threshold, lockout duration, setting windows login, tutorial, tips

4. Lalu klik 2x pada Account lockout duration. Anda bisa mengisi jumlah menit untuk menentukan berapa lama akun akan terkunci. Kemudian klik OK.

Cara Setting Akun Windows Terkunci Otomatis Setelah User Salah Memasukkan Password, Cara Membuat Keamanan Tambahan Untuk Windows: Setting Security Policy, lockout threshold, lockout duration, setting windows login, tutorial, tips

B. Melalui Command Prompt.

1. Buka Command Prompt (cmd) sebagai Administrator.
2. Ketik net accounts. maka akan terbuka status Login Windows anda.
3. Ketik net accounts /lockoutthreshold:3

Angka 3 bisa anda ganti dengan angka berapapun sesuai keinginan. Angka tersebut menunjukkan jumlah berapa kali kesempatan bagi user untuk input password yang benar sebelum akun benar-benar terkunci.

Jika perintah yang anda ketikkan berhasil akan ada pemberitahuan The command completed successfully.

4. Ketik net accounts /lockoutduration:30

Angka 30 bisa anda ganti dengan angka berapapun sesuai kebutuhan. Angka itu menunjukkan berapa menit akun akan terkunci jika batas kesempatan input password yang benar sudah habis.

Jika perintah yang anda ketikkan berhasil akan ada pemberitahuan The command completed successfully.


Untuk mengembalikan ke settingan awal dimana anda tidak memerlukan fitur ini, anda bisa mengganti angka-angka yang sudah anda tetapkan tadi menjadi angka 0.

Demikian tutorial Cara Setting Akun Windows Terkunci Otomatis Setelah User Salah Memasukkan Password. Semoga bermanfaat.

Wednesday, June 12, 2019

How To Solve Edit Windows Boot Option For Windows 7

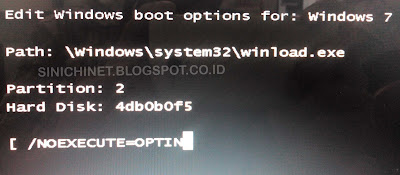
Do you ever run into a problem when turning on or booting your computer using OS (Operating System) Windows 7, and pops up an alert/warning such as :

Edit Windows boot options for : Windows 7
Path: \windows\system32\winload.exe
Partition : 2
Hard Disk : 4db0b0f5 (the numbers on the hard disk can be changed depending on your hard disk)
[ /NOEXECUTE=OPTIN]

booting windows 7, boot failed, failed to enter windows, computer can't boot, laptop failed to enter windows, boot error, how to fix, noexecute, winload, optionedit, startup window, boot failure


Actually, if you have this problem, you can still use Windows, and your data in the PC will not be lost. But these issues are very disturbing because we have to press the ENTER key first in order to get into Windows.

How to fix the Edit Windows Boot Option For Windows 7? Please follow these steps :
  • First , open a Command Crompt as an Administrator.
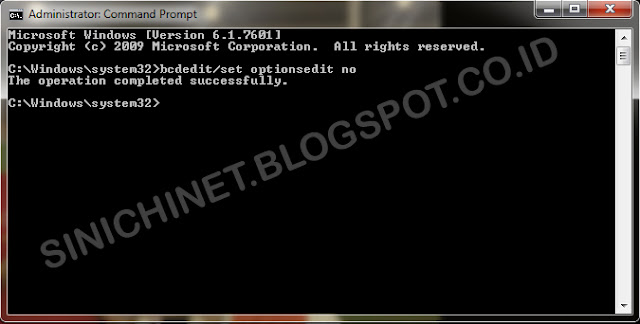
  • Then type the following command : bcdedit / set optionsedit no and press ENTER.
  • If successful, it will look like the image below :

booting windows 7, boot failed, failed to enter windows, computer can't boot, laptop failed to enter windows, boot error, how to fix, noexecute, winload, optionedit, startup window, boot failure

Please restart your computer and your Windows 7 boot problem has been resolved .

Friday, May 31, 2019

3 Cara Membuka Command Prompt Sebagai Administrator

3 CARA MUDAH MEMBUKA COMMAND PROMPT (CMD) SEBAGAI ADMINISTRATOR DI WINDOWS 7

Terkadang kita memerlukan hak akses sebagai Administrator dikala menggunakan Command Prompt (cmd). Pada kesempatan kali ini, admin akan memberikan tutorial cara untuk menjalankan Command Prompt (cmd) sebagai Administrator.


# MEMBUKA COMMAND PROMPT DARI TOMBOL START (BAGIAN 1).
  1. Klik tombol Start.
  2. Pilih opsi All Programs.
  3. Kemudian opsi Accessories.
    Klik kanan pada opsi Command Prompt dan pilih Run as administrator.

3 Cara Membuka Command Prompt Sebagai Administrator, cmd, command prompt, hak akses administrator, windows, tutorial komputer
MEMBUKA COMMAND PROMPT DARI TOMBOL START (BAGIAN 1)

# MEMBUKA COMMAND PROMPT DARI TOMBOL START (BAGIAN 2).
  1. Klik tombol Start.
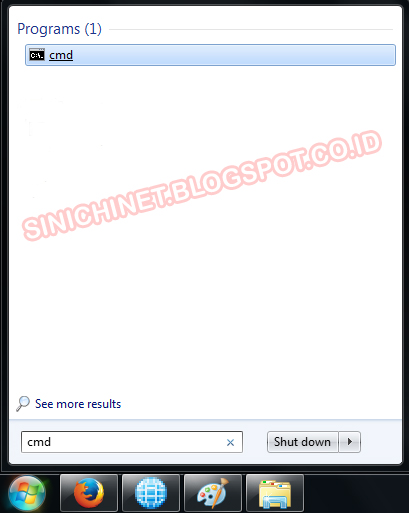
  2. Ketik cmd pada kotak pencarian.
  3. sorot pada pilihan cmd lalu tekan tombol Ctrl + Shift + Enter.

3 Cara Membuka Command Prompt Sebagai Administrator, cmd, command prompt, hak akses administrator, windows, tutorial komputer
MEMBUKA COMMAND PROMPT DARI TOMBOL START (BAGIAN 2)

# MEMBUKA COMMAND PROMPT DARI WINDOWS EXPLORER.

Cara yang ketiga ini adalah cara yang paling ribet, namun yang selalu berhasil. Gunakan cara yang ketiga ini apabila 2 cara diatas tidak bisa membuat anda mendapatkan hak akses sebagai Administrator.
  1. Buka Windows Explorer dan menuju C:\Windows\System32
  2. Cari cmd kemudian klik kanan dan pilih Run as administrator.

3 Cara Membuka Command Prompt Sebagai Administrator, cmd, command prompt, hak akses administrator, windows, tutorial komputer
MEMBUKA COMMAND PROMPT DARI WINDOWS EXPLORER

Terdapat perbedaan pada tampilan Command Prompt yang menunjukkan apakah anda berhasil mendapatkan hak akses sebagai administrator atau tidak. Gambar pertama menunjukkan bahwa anda mendapatkan hak akses administrator, sedangkan gambar kedua menunjukkan bahwa anda hanya mendapat hak akses sebagai user biasa.

3 Cara Membuka Command Prompt Sebagai Administrator, cmd, command prompt, hak akses administrator, windows, tutorial komputer
Berhasil mendapatkan hak akses sebagai administrator

3 Cara Membuka Command Prompt Sebagai Administrator, cmd, command prompt, hak akses administrator, windows, tutorial komputer
Hanya mendapatkan hak akses sebagai user

Demikian tutorial singkat 3 cara mudah membuka command prompt sebagai administrator. Semoga bermanfaat. #komputer #tutorial #windows7

Friday, May 17, 2019

How to Block USB-Storage (pen drives & External Hard Drive) on Windows 7, 8 and 10

If you ask, what are the benefits of blocking USB-Storage, or blocking a Pen Drive and an external hard drive? Actually there are many benefits, but the two most important are:
  1. Securing or preventing theft of important data & documents on a computer by using USB-storage.
  2. Preventing transmission of viruses from pendrive & external hard drives.
How to Block USB-Storage (pen drives & External Hard Drive) on Windows 7, 8 and 10?

There are 2 easy ways, using the Registry Editor & Local Group Policy Editor in Windows. You can chose one of them.

A. Using Registry Editor (regedit)

  1. Press Ctrl + R or through Start - Run to open Run Command.
  2. Type regedit to run the Registry Editor.
  3. Follow the following navigation: HKEY_LOCAL_MACHINE \ SYSTEM \ CurrentControlSet \ Services \ USBSTOR
  4. In the right column, click 2x on Start.
  5. In the Value data section, change the number 3 to number 4. Click the OK button.

how to block Pen drives, flasdisk, external hard drive, tips, tricks, win7, win10, prevent the spread of flashdisk viruses, prevent data theft


B. Using the Local Group Policy Editor (gpedit.msc)
  1. Press Ctrl + R or through Start - Run to open Run Command.
  2. Type gpedit.msc to run the Local Group Policy Editor.
  3. Follow the following navigation: Computer Configuration \ Administrator Templates \ System \ Removable Storage Access.
  4. In the right column, click 2x on All Removeable Storage classes: Deny all access
  5. Select the Enable option, and click Apply.
how to block Pen drives, flasdisk, external hard drive, tips, tricks, win7, win10, prevent the spread of flashdisk viruses, prevent data theft


That's the tutorial How to Block USB-Storage (pen drives & External Hard Drive) on Windows 7, 8 and 10. Hopefully it can be useful for you.

Thursday, May 16, 2019

How To Permanently Turn Off Windows 10 Update

Windows 10 has set Windows updates automatically. But sometimes Win10 updates actually feel very annoying to users. In addition to wasteful quota (for users with limited internet quota), the Windows Updater process that runs, can slow down the performance of your Windows 10.

How To Permanently Turn Off Windows 10 Update?

There are 3 steps that must be done to permanently turn off Windows10 Update. A & B step to disable the updater, and step C to redirect the update link to the Windows server. step C is actually just in case the updater is active again without knowing why, or if someone activates it without our knowledge.

A. Via Command Prompt.

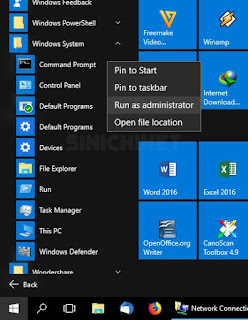
1. Follow the following navigation: Start/All Apps/Windows System/Command Prompt.
2. Right-click on the Command Prompt and select Run as administrator.

How to turn off Windows10 auto update by force to save internet quota. Tutorial to save quota on Windows10, turn off permanent updates, tips, effective tricks, steps, easy, fast, sure way, turn off updates forever

3. At the Command Prompt, type the following 2 commands:

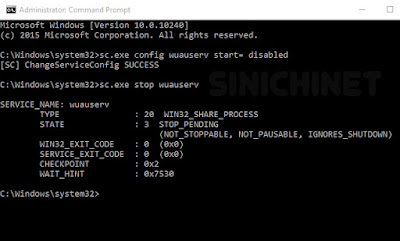
sc.exe config wuauserv start= disabled
sc.exe stop wuauserv

If the response that comes out in the Command Prompt matches the image below, then step 1 has succeeded, and please proceed to the next step.

How to turn off Windows10 auto update by force to save internet quota. Tutorial to save quota on Windows10, turn off permanent updates, tips, effective tricks, steps, easy, fast, sure way, turn off updates forever

B. Through Services (services.msc). This second step is to help complete the process in the first step.

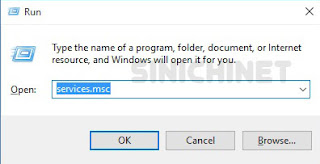
1. Press Ctrl + R or through Start - Run to open Run Command.
2. Type services.msc to run the Services feature.

How to turn off Windows10 auto update by force to save internet quota. Tutorial to save quota on Windows10, turn off permanent updates, tips, effective tricks, steps, easy, fast, sure way, turn off updates forever

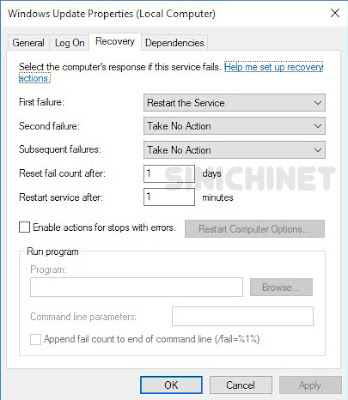
3. In the right column select the Windows Updates option, and click 2x so that the Windows Update Properties (Local Computer) window appears.
4. Select the Recovery tab. In First failure, change the Restart the Service option to Take No Action. Click the Apply and OK button.

How to turn off Windows10 auto update by force to save internet quota. Tutorial to save quota on Windows10, turn off permanent updates, tips, effective tricks, steps, easy, fast, sure way, turn off updates forever

C. Through Registry Editor (regedit). Actually the 2 steps above are enough, but step 3 is better to be done just in case.

1. Press Ctrl+R or through Start - Run to open Run Command.
2. Type regedit to run the Registry Editor.
3. Follow the following navigation: HKEY_LOCAL_MACHINE\SYSTEM\CurrentControlSet\Services\wuauserv
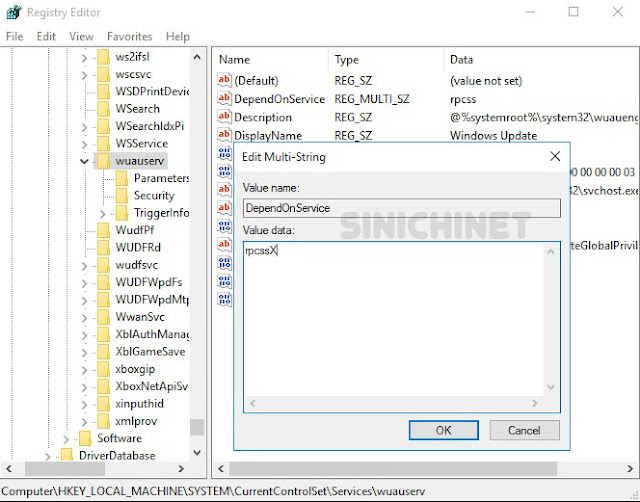
4. We will modify the data in DependOnService and ImagePath.

  • DependOnService : rpcss changed to rpcssX
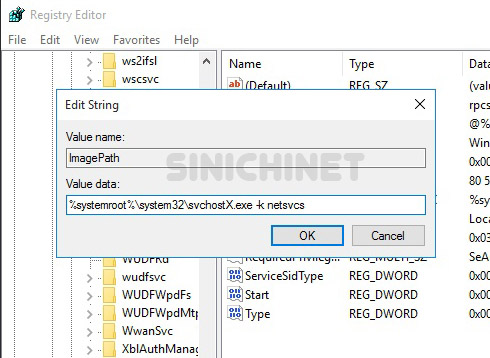
  • ImagePath : %systemroot%\system32\svchost.exe -k netsvcs changed to %systemroot%\system32\svchostX.exe -k netsvcs
For more details, please see the 2 images below:
How to turn off Windows10 auto update by force to save internet quota. Tutorial to save quota on Windows10, turn off permanent updates, tips, effective tricks, steps, easy, fast, sure way, turn off updates forever

Well, that's the tutorial How to Permanently Turn Off Windows10 Update. Hopefully it can be useful for you.

Tuesday, May 14, 2019

Cara Mudah Mematikan Update Windows 10 Secara Permanen

Bagaimana Cara Mematikan Update Windows 10 Secara Permanen?

Ada 4 langkah yang harus dilakukan untuk mematikan secara permanen Update Windows 10.
  • Langkah 1 untuk menonaktifkan updater-nya.
  • Langkah 2 untuk mengalihkan link update yang menuju ke server Windows.
  • Langkah 3 berfungsi menghapus file yang diperlukan untuk proses update Windows 10 (jika ada).
  • Langkah 4 untuk mematikan fitur yang memaksa Windows 10 untuk selalu update.

Cara mematikan auto update Windows 10 secara paksa untuk mengehmat kuota internet. Tutorial menghemat kuota di Windows 10, matikan update permanen, tips, trik manjur, langkah, cara mudah, cepat, manjur, cara pasti, matikan update selamanya

A. Langkah 1 : Melalui Services (services.msc).

1. Tekan Tombol Windows+R atau melalui Start - Run untuk membuka Run Command.
2. Ketik services.msc untuk menjalankan fitur Services.

Cara mematikan auto update Windows 10 secara paksa untuk mengehmat kuota internet. Tutorial menghemat kuota di Windows 10, matikan update permanen, tips, trik manjur, langkah, cara mudah, cepat, manjur, cara pasti, matikan update selamanya

3. Pilihlah opsi Windows Updates pada kolom sebelah kanan, dan klik 2x sehingga keluar jendela Windows Update Properties (Local Computer).
4. Pada tab General, untuk bagian Startup type pilihlah opsi Disabled. Setelah itu tekan tombol Stop.

Cara mematikan auto update Windows 10 secara paksa untuk mengehmat kuota internet. Tutorial menghemat kuota di Windows 10, matikan update permanen, tips, trik manjur, langkah, cara mudah, cepat, manjur, cara pasti, matikan update selamanya

5. Pilihlah tab Recovery. Pada First failure, gantilah pilihan Restart the Service menjadi Take No Action. Klik tombol Apply dan OK.

Cara mematikan auto update Windows 10 secara paksa untuk mengehmat kuota internet. Tutorial menghemat kuota di Windows 10, matikan update permanen, tips, trik manjur, langkah, cara mudah, cepat, manjur, cara pasti, matikan update selamanya

B. Langkah 2 : Melalui Registry Editor (regedit).

1. Tekan Tombol Windows+R atau melalui Start - Run untuk membuka Run Command.
2. Ketik regedit untuk menjalankan Registry Editor.
3. Ikuti navigasi berikut ini: HKEY_LOCAL_MACHINE\SYSTEM\CurrentControlSet\Services\wuauserv
4. Kita akan merubah data pada DependOnService dan ImagePath.
  • DependOnService : rpcss dirubah menjadi rpcssX
  • ImagePath : %systemroot%\system32\svchost.exe -k netsvcs dirubah menjadi %systemroot%\system32\svchostX.exe -k netsvcs


Cara mematikan auto update Windows 10 secara paksa untuk mengehmat kuota internet. Tutorial menghemat kuota di Windows 10, matikan update permanen, tips, trik manjur, langkah, cara mudah, cepat, manjur, cara pasti, matikan update selamanya

Cara mematikan auto update Windows 10 secara paksa untuk mengehmat kuota internet. Tutorial menghemat kuota di Windows 10, matikan update permanen, tips, trik manjur, langkah, cara mudah, cepat, manjur, cara pasti, matikan update selamanya

5. Ikuti navigasi berikut ini : HKEY_LOCAL_MACHINE\SYSTEM\CurrentControlSet\Services\WaaSMedicSvc
6. Klik 2x pada bagian Start, dan ubah angka 3 menjadi angka 4.

C. Langkah 3 : Melalui File Explorer.

1. Tekan tombol Windows+E atau melalui Start - Windows System - File Explorer.
2. Ikuti navigasi berikut ini: C:\Windows\SoftwareDistribution.
3. Hapus (Delete) semua folder & file yang terdapat di dalam folder Download tersebut.

D. Langkah 4 : Melalui Command Prompt.

1. Ikuti navigasi berikut Start - Windows System - Command Prompt.
2. Jalankan Command Prompt sebagai administrator.
3. Ketik atau copy perintah dibawah ini lalu tekan Enter.

takeown /f "%windir%\System32\UsoClient.exe" /a

4. Lanjutkan Ketik atau copy perintah dibawah ini dan tekan Enter.

icacls "%windir%\System32\UsoClient.exe" /inheritance:r /remove "Administrators" "Authenticated Users" "Users" "System"

Catatan: Jika anda ingin menjalankan lagi fitur UsoClient dikarenakan ingin update Windows, anda bisa menggunakan perintah berikut:

icalcs "%windir%\System32\UsoClient.exe" /reset

5. Restart Komputer anda.

Demikian artikel Cara Mudah Mematikan Update Windows 10 Secara Permanen. Semoga bermanfaat.