Friday, February 21, 2020

Cara Memindah Chat WhatsApp Secara Manual Ke Sesama Smartphone Android

Bagaimana cara memindah obrolan WhatsApp secara manual ke sesama smartphone Android?

Prosesnya adalah kita melakukan backup terlebih dahulu, kemudian memindahkan file hasil backup tersebut ke perangkat smartphone Android baru milik anda. Sebelumnya pastikan Smartphone Android baru anda sudah tersedia aplikasi WhatsApp tapi jangan melakukan aktivasi akun dulu.

Untuk lebih jelasnya silahkan simak caranya dibawah ini:

# Buka WhatsApp. Silahkan buka WhatsApp anda terlebih dahulu dan tekan tombol Settings yang berupa 3 titik vertikal di sebelah kanan atas.

# Settings. Pilih opsi Settings.

# Chats setting. Pilih opsi Chats --> Chat backup.
Sebelum melakukan proses backup, cek terlebih dahulu pilihan pada 'Back up to Google Drive'. Pastikan opsi yang terpilih adalah 'Never' (No. 3). Setelah itu baru tekan tombol 'BACK UP' (No. 4) dan tunggu hingga proses selesai.

Cara Memindah Chat WhatsApp Secara Manual Ke Sesama Smartphone Android, ke hp android baru,riwayat chat whatsapp, history chat whatsapp, pindah wa tanpa hapus chat, FAQ, tutorial, tips, trik, transfer chat whatsapp, percakapan whatsapp, obrolan whatsapp

# Penyimpanan Database WhatsApp. Setelah proses Backup selesai, waktunya memindah data hasil backup tersebut. Apakah letaknya di Phone Storage atau SD card, itu semua tergantung dari setelan smartphone anda masing-masing. Anda bisa cek kedua lokasi tersebut jika tidak yakin.

Lokasinya adalah : Phone storage/SD card --> WhatsApp --> Database.

Anda cukup memindahkan 2 file terbaru saja, tidak perlu semuanya (lihat gambar dibawah). Untuk memindahkannya bisa menggunakan bantuan komputer atau menggunakan aplikasi seperti SHAREit.

Cara Memindah Chat WhatsApp Secara Manual Ke Sesama Smartphone Android, ke hp android baru,riwayat chat whatsapp, history chat whatsapp, pindah wa tanpa hapus chat, FAQ, tutorial, tips, trik, transfer chat whatsapp, percakapan whatsapp, obrolan whatsapp

PERHATIAN!! Apabila anda mengalami kesulitan semisal data backup tanggal terakhir tidak muncul baik itu lewat PC atau apk SHAREit, cukup lakukan cara ini: Hapus semua data backup pada Database WhatsApp dan kemudian lakukan backup ulang seperti cara diatas.

# Penyimpanan Database di Smartphone baru. Pindahkan kedua file tersebut di lokasi Phone storage/SD card --> WhatsApp --> Database.

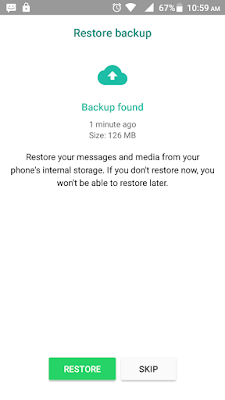
# Aktivasi Akun WhatsApp. Lakukan aktivasi akun WhatsApp. Jika muncul opsi Restore backup langsung tekan saja tombol RESTORE dan tunggu prosesnya hingga selesai. Begitu proses aktivasi selesai, chat lama anda akan muncul lagi.

Cara Memindah Chat WhatsApp Secara Manual Ke Sesama Smartphone Android, ke hp android baru,riwayat chat whatsapp, history chat whatsapp, pindah wa tanpa hapus chat, FAQ, tutorial, tips, trik, transfer chat whatsapp, percakapan whatsapp, obrolan whatsapp

Demikianlah tutorial singkat Cara Memindah Chat WhatsApp Secara Manual Ke Sesama Smartphone Android. Semoga bermanfaat

Monday, February 17, 2020

Cara Mudah Ganti Nada Notifikasi WhatsApp Pada Android

Mengapa Nada Notifikasi WhatsApp sebaiknya diganti? Selain agar tidak bosan dengan ringtone default, mengganti nada pemberitahuan pada WhatsApp juga bisa memudahkan penggunanya untuk mengetahui perbedaan apakah pesan yang masuk berasal dari obrolan personal, obrolan group, atau malah ada panggilan yang masuk.


Bagaimana Cara Merubah Suara Nada Pemberitahuan WhatsApp Pada Android?

1. Buka Aplikasi WhatsApp, dan tekan tanda tiga titik vertikal di pojok kanan atas.
2. Pilih opsi Settings (Setelan).
3. Pilih opsi Notifications.

Cara Mudah Ganti Nada Notifikasi WhatsApp android, rubah nada dering whatsapp, trik merubah ringtone whatsapp, tutorial, tips, FAQ, smartphone

4. Pada opsi Notifications terdapat 3 jenis notifikasi yang bisa anda atur yaitu :
  • Message Notifications (Notifikasi Pesan).
  • Group Notifications (Notifikasi Grup).
  • Call Notifications (Notifikasi Panggilan).
Disitu anda bisa mengganti Nada Notifikasi sesuai dengan yang anda inginkan. Saran saya, sebaiknya anda menggunakan bantuan aplikasi ES File Explorer atau yang sejenisnya untuk memudahkan anda mencari nada/ringtone dari musik atau lagu favorit anda.

Cara Mudah Ganti Nada Notifikasi WhatsApp android, rubah nada dering whatsapp, trik merubah ringtone whatsapp, tutorial, tips, FAQ, smartphone

Demikian tutorial singkat Cara Mudah Ganti Nada Notifikasi WhatsApp Pada Android. Semoga bermanfaat.

Friday, February 14, 2020

Cara Ganti Nada Dering Notifikasi Untuk Kontak / Grup Tertentu Pada WhatsApp

Artikel kali ini adalah tentang cara mengganti nada pemberitahuan untuk kontak atau grup tertentu. Dengan demikian kita akan mengetahui darimana pesan atau telepon yang kita terima. Kita bisa membedakan antara nada notifikasi kontak istri, pak bos, dan yang lainnya sehingga kita tahu mana pesan yang harus segera dibaca atau ditunda nanti dulu.

Catatan : Budayakan membaca tutorial hingga selesai terlebih dahulu sebelum mencoba.


Bagaimamana cara mengganti nada pemberitahuan untuk kontak dan grup tertentu pada WhatsApp?

1. Buka chat kontak yang akan anda ganti nada notifikasinya.
2. Tekan pada nama akun tersebut (No.1).
3. Pilih opsi Custom notifications (No.2).

cara ganti nada notifikasi kontak / grup Tertentu Pada whatsApp android, rubah nada dering whatsapp, trik merubah ringtone whatsapp, tutorial, tips, FAQ, smartphone android

4. Beri tanda centang pada Use custom notifications. Setelah itu anda bisa merubah Message notifications dan Call Notifications sesuai keinginan anda.
5. Jika anda ingin mengembalikan ke setelan awal, anda bisa klik ikon 3 titik vertikal di pojok kanan atas dan kemudian tekan Reset notification settings.

cara ganti nada notifikasi kontak / grup Tertentu Pada whatsApp android, rubah nada dering whatsapp, trik merubah ringtone whatsapp, tutorial, tips, FAQ, smartphone android

Demikian tutorial singkat Cara Ganti Nada Notifikasi Untuk Kontak / Grup Tertentu Pada WhatsApp. Semoga bermanfaat.

Monday, February 10, 2020

How To Fix "Error 1935" When Installing Microsoft Office 2013 & 2016 On Microsoft Windows 10

Have you ever experienced an error when installing Microsoft Office Professional Plus 2013 or 2016 on Windows10, and a warning appears as below?

1: 1935 2: {BBC00726-F9C9-4C83-B6F0-C85B2C695753) 3: 0x80131049 4:
IAssemblyCacheltem 5: Commit 6: Policy.14.0.office, fileVersion= "15.0.4420.1017",
version="15.0.0.0000000", culture= "neutral", publicKeyToken="71E9BCE111E9429C",
processorAfchitecture="MSIL"


How to fix "Error 1935" when installing Microsoft Office 2013 & 2016 on Microsoft Windows 10, Easy Ways to Resolve Errors When Installing Microsoft Office 2013 and 2016 on Microsoft Windows 10, error 1: 1935, how to, tips, tricks, tutorials,

If you are facing this problem, don't panic. Try the tutorial that we present below. These tips are guaranteed to be 98% successful, and we've tried it on Microsoft Windows Version 1809 (OS Build 17763.195).

How to fix "Error 1935" when installing Microsoft Office 2013 & 2016 on Microsoft Windows 10?

1. Press the [Windows + R] Button, or through Start - Run to open the Run Command.
2. Type regedit to run the Registry Editor feature.

How to fix "Error 1935" when installing Microsoft Office 2013 & 2016 on Microsoft Windows 10, Easy Ways to Resolve Errors When Installing Microsoft Office 2013 and 2016 on Microsoft Windows 10, error 1: 1935, how to, tips, tricks, tutorials,

3. Follow the navigation: Computer\HKEY_LOCAL_MACHINE\SOFTWARE\Microsoft\AppModel
4. Change (Rename) AppModel to AppModel.old
5. Restart the computer and try again to install your Microsoft Office.

Okay, thus the article "How to fix "Error 1935" when installing Microsoft Office 2013 & 2016 on Microsoft Windows 10". Hopefully this article useful for you.

Friday, February 7, 2020

How To Remove The Canon Pixma iP2770 Printer Case Cover

As a Canon iP2770 printer user, you should know, at least a few things, about how to do light maintenance when necessary. This is because, in addition to cost savings, we can also save time than sending our printer to a service center or call a technician.

For example there is paper jammed on the printer, and when you pick it up there is a scrap of paper left in the printer. So inevitably you have to disassemble your Canon printer.

No need to be confused, just remove the top casing of the printer cover, and you can easily take the pieces of paper.

how to remove the top cover of Canon Printer PIXMA iP 2770, How To Open Printer Case, How to Unload Printer, Guide, Unloading printer, troubleshooting and mainteance, printer service, printer service, repair your own printer

How To Remove The Canon Pixma iP2770 Printer Case Cover?

# Open the top cover. Open the top cover of the printer to locate the screws and locks.

how to remove the top cover of Canon Printer PIXMA iP 2770, How To Open Printer Case, How to Unload Printer, Guide, Unloading printer, troubleshooting and mainteance, printer service, printer service, repair your own printer

# Open screws. There are 4 screws you have to open first. 2 pieces on the front (right and left), and 2 more on the top (right and left). The screw on the top lies inside the hole beside the hinge of the paper tray lid. For more details please see in the picture below.

how to remove the top cover of Canon Printer PIXMA iP 2770, How To Open Printer Case, How to Unload Printer, Guide, Unloading printer, troubleshooting and mainteance, printer service, printer service, repair your own printer

how to remove the top cover of Canon Printer PIXMA iP 2770, How To Open Printer Case, How to Unload Printer, Guide, Unloading printer, troubleshooting and mainteance, printer service, printer service, repair your own printer

# Open all Locks. After removing all screws, you can proceed by unlocking 3 locks located on the body of the printer. 2 locks are on the front, and 1 lock is on the back of the printer. Use the help of a screwdriver to pry the locks.

how to remove the top cover of Canon Printer PIXMA iP 2770, How To Open Printer Case, How to Unload Printer, Guide, Unloading printer, troubleshooting and mainteance, printer service, printer service, repair your own printer

how to remove the top cover of Canon Printer PIXMA iP 2770, How To Open Printer Case, How to Unload Printer, Guide, Unloading printer, troubleshooting and mainteance, printer service, printer service, repair your own printer

# Lift the casing up. After all the screws and locks are released, lift the casing up to remove it. No need to force to lift it.

how to remove the top cover of Canon Printer PIXMA iP 2770, How To Open Printer Case, How to Unload Printer, Guide, Unloading printer, troubleshooting and mainteance, printer service, printer service, repair your own printer

Monday, February 3, 2020

Ink Color Position In Canon Printer Color Cartridge

If you intend to self-refuel the color cartridge on a Canon printer, you must know the position of each color on the cartridge. Errors in determining color locations have a major impact on the results of the print process.

For the example, we use the CL-811 cartridge, which is used on Canon Pixma Printer iP-2770. Unlike black cartridges, color cartridges have 3 different color locations.

Ink Color Position In Canon Printer Color Cartridge, ink, red, magenta, blue, cyan, yellow, color sequence, ink hole, easy way of ink contents, refill ink, refill, sinichinet

To make it easier to know the three charging locations, remove the sticker / label on the cartridge. You can make a filling hole with a drill, screw, or nail.

So where are the ink color locations on the Canon printer color cartridge?

The third color location arrangement is:
1. Red Color (Magenta): located at the top.
2. Blue Color (Cyan): located on the bottom left.
3. Yellow color (Yellow): located on the bottom right.

Ink Color Position In Canon Printer Color Cartridge, ink, red, magenta, blue, cyan, yellow, color sequence, ink hole, easy way of ink contents, refill ink, refill, sinichinet

The positions of those three colors apply to the following Canon Pixma color printer cartridges:
iP2770/ iP2772/ iP1180/ iP1200/ iP1300/ iP1600/ iP1700/ iP1880/ iP1890/ iP2200/ iP2580/ iP2680
MP145/ MP150/ MP160/ MP170/ MP180/ MP198/ MP218/ MP228/ MP450/ MP460/ MP476/ MP258/ MP268/ MP276/ MP287/ MP486/ MP296/ MP497
MX308/ MX318/ MX328/ MX338/ MX347/ MX357/ MX366/ MX416/ MX426

Friday, January 31, 2020

Cara Cepat Update Manual Windows Defender Pada Windows 10

Windows Defender pada windows 10 masih bisa diupdate secara manual meskipun Windows Update sudah dimatikan. Dengan demikian anda tidak perlu khawatir dengan keamanan Windows 10 anda.

update manual,antivirus,offline,update,windows defender,windows 10,ransomware protections,

Bagaimana Cara Update Manual Windows Defender Antivirus and other Microsoft antimalware Pada Windows 10?

1. Untuk mendownload Windows Defender Definition version terbaru anda bisa menuju laman Microsoft Security Intelligence, atau silahkan klik link berikut ini:
https://www.microsoft.com/en-us/wdsi/defenderupdates.
Pilih Definition version yang sesuai dengan jenis Windows 10 anda yaitu 32-bit atau 64-bit.
update manual,antivirus,offline,update,windows defender,windows 10,ransomware protections,

2. Ketika muncul jendela Opening mpam-fe.exe, klik tombol Save File dan tunggu beberapa saat hingga proses download selesai.

update manual,antivirus,offline,update,windows defender,windows 10,ransomware protections,

3. Buka folder lokasi hasil download tadi. Klik 2x pada file tersebut dan tunggu beberapa saat.

update manual,antivirus,offline,update,windows defender,windows 10,ransomware protections,

4. Apabila tidak nampak proses update, tidak perlu panik. Anda cukup melakukan cek pada bagian Virus & threat protection update. Ikuti navigasi berikut:
Start - Settings - Update & Security - Windows Security - Virus & threat protection

Jika tanggal dan jam nya sudah sesuai dengan hari anda melakukan update, maka proses update Windows Defender anda sudah berhasil.

update manual,antivirus,offline,update,windows defender,windows 10,ransomware protections,

Demikian tutorial singkat Cara Update Manual Windows Defender Antivirus and other Microsoft antimalware Pada Windows 10. Semoga bermanfaat.